简单工厂模式(Simple Factory Pattern)
简介
简单工厂模式是一种非常常用的设计模式,但是并不属于GoF中的23中设计模式。简单设计模式有很多种实现方式。
本文我们就来讨论简单工厂模式的实现方式,以及如何借助Spring实现一个扩展性很好的简单工厂模式。
定义
- creates objects without exposing the instantiation logic to the client.
- refers to the newly created object through a common interface
- 创建对象但是不想客户端暴露对象实例化的逻辑
- 通过通用接口引用新创建的对象
实现
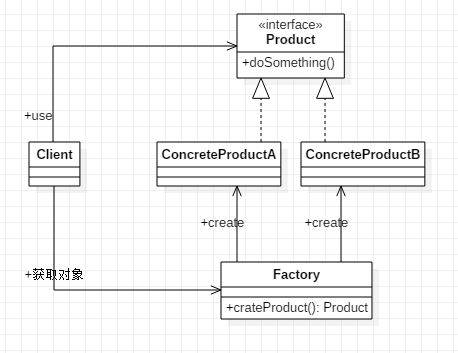
- Product:商品接口。
- ConcreteProductA和ConcreteProductB:分别为商品的两个实现。
- Factory:工厂,创建商品实例,并将商品实例返回给客户端供客户端调用。
- Client:客户端,商品的使用者。
- Product
- ConcreteProduct
- Factory
- Client
public interface Product {
    void doSomething();
}
public class ConcreteProductA implements Product {
    @Override
    public void doSomething() {
        System.out.println("This is product A");
    }
}

public class ConcreteProductB implements Product {

    @Override
    public void doSomething() {
        System.out.println("This is product B");
    }
}
public class Factory {

    public Product createProduct(String type) {
        if (type.equalsIgnoreCase("A")) {
            return new ConcreteProductA();
        } else if (type.equalsIgnoreCase("A")) {
            return new ConcreteProductB();
        }
        throw new RuntimeException("不支持的类型");
    }
}
public class Client {

    public static void main(String[] args) {
        Factory factory = new Factory();
        Product product = factory.createProduct("A");
        product.doSomething();
    }
}
其实简单工厂模式的核心就是下面的代码
if (type.equalsIgnoreCase("A")) {
    return new ConcreteProductA();
} else if (type.equalsIgnoreCase("A")) {
    return new ConcreteProductB();
}
通过判断传入的参数,然后根据参数创建不同的对象。
这种方式的弊端就是我们没增加一种Product的实现,都需要修改工厂类。下面我们将一种不用修改工厂类的方法。
将产品注册到工厂
Product、ConcreteProductA、ConcreteProductB不变。
- Factory
- Client
public class Factory {

    public Map<String, Class<? extends Product>> classMap = new HashMap<>();

    public void register(String id, Class<? extends Product> clz) {
        System.out.println("注册产品:" + id + "," + clz);
        this.classMap.put(id, clz);
    }

    public Product createProduct(String type) {
        Class<? extends Product> clz = this.classMap.get(type);
        if (clz != null) {
            try {
                return clz.newInstance();
            } catch (InstantiationException | IllegalAccessException e) {
                e.printStackTrace();
            }
        }
        throw new RuntimeException("不支持的类型");
    }
}
public class Client {

    public static void main(String[] args) {
        Factory factory = new Factory();
        factory.register("A", ConcreteProductA.class);
        factory.register("B", ConcreteProductB.class);

        Product product = factory.createProduct("A");
        product.doSomething();
    }
}
这里我们让客户端在使用的时候将Product实现类注册到工厂中,然后在Client调用的Factory.createProduct()时,找到对应的类,然后通过Java的反射机制实例化类,并返回给客户端。
这种方式我们增加Product实现类就不需要更改Factory中的源代码了。
这里可能会有人纠结,我们虽然没有改
Factory的源代码,但是更改了Client的源代码啊。这同样违反了开闭原则啊。但是其实不是这样的,Client作为使用者,需求的变更必然会伴随着使用者的变更。而且我们在实际项目中可以通过Spring来实现工厂和客户端都不需要修改源代码。
借助Spring实现一种更好的简单工厂
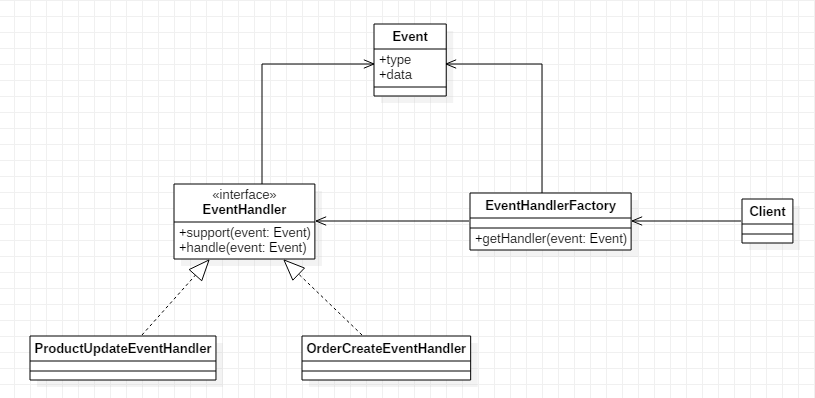
系统中定义了一些事件,每个事件对应一个事件处理器。事件触发后,由Client从EventHandlerFactory获取到事件处理类,然后调用其handle(event:Event)方法来处理事件。
实现思路
EventHandler提供一个support方法来判断其实现类是否支持对应的事件。EventHandler实现类交由Spring管理。EventHandlerFactory从spring的ApplicationContext中获取到EventHandler实现类,在调用getHandler方法时,遍历这些实现类,然后调用其support方法来判断是否支持传入的事件类型。
实现
先配置Spring的配置文件,sfp3/applicationContext.xml
<?xml version="1.0" encoding="UTF-8" ?>
<beans xmlns="http://www.springframework.org/schema/beans"
       xmlns:xsi="http://www.w3.org/2001/XMLSchema-instance"
       xmlns:context="http://www.springframework.org/schema/context"
       xsi:schemaLocation="http://www.springframework.org/schema/beans
	       http://www.springframework.org/schema/beans/spring-beans.xsd
	       http://www.springframework.org/schema/context
	       http://www.springframework.org/schema/context/spring-context.xsd">

    <context:component-scan base-package="com.codestd.design.patterns.sfp3"/>

</beans>
这里我们只配置注解,Bean的配置使用注解的方式配置。
- Event
- EventHandler
- ProductUpdateEventHandler
- OrderCreateEventHandler
- EventHandlerFactory
@Data
public class Event {
    private String type;
    private String data;
}
public interface EventHandler {

    /**
     * 是否支持此事件类型
     * @param event 事件信息
     */
    boolean support(Event event);

    /**
     * 处理事件
     * @param event 事件信息
     */
    void handle(Event event);
}
@Service
public class ProductUpdateEventHandler implements EventHandler {
    @Override
    public boolean support(Event event) {
        if (event != null) {
            return event.getType().equals("PRODUCT.UPDATE");
        }
        return false;
    }

    @Override
    public void handle(Event event) {
        System.out.println("事件数据为:" + event.getData());
    }
}
@Service
public class OrderCreateEventHandler implements EventHandler {
    @Override
    public boolean support(Event event) {
        if (event != null) {
            return event.getType().equals("ORDER.CREATE");
        }
        return false;
    }

    @Override
    public void handle(Event event) {
        System.out.println("事件数据为:" + event.getData());
    }
}
@Component
public class EventHandlerFactory implements ApplicationContextAware, InitializingBean {

    private ApplicationContext applicationContext;
    private List<EventHandler> eventHandlerList = new ArrayList<>();

    public EventHandler getHandler(Event event) {
        for (EventHandler eventHandler : eventHandlerList) {
            if (eventHandler.support(event)) {
                return eventHandler;
            }
        }
        throw new RuntimeException("不支持的事件类型");
    }

    @Override
    public void afterPropertiesSet() throws Exception {
        Map<String, EventHandler> beansMap = this.applicationContext.getBeansOfType(EventHandler.class);
        this.eventHandlerList.addAll(beansMap.values());
    }

    @Override
    public void setApplicationContext(ApplicationContext applicationContext) throws BeansException {
        this.applicationContext = applicationContext;
    }
}
实现ApplicationContextAware接口,是为了能够将applicationContext注入进来,实现InitializingBean是为了在注入后初始化EventHandler实现类实例列表。
下面看客户端中的使用。
public class Client {

    public static void main(String[] args) {
        ClassPathXmlApplicationContext context = new ClassPathXmlApplicationContext("sfp2/applicationContext.xml");

        EventHandlerFactory eventHandlerFactory = context.getBean(EventHandlerFactory.class);

        Event event = new Event();
        event.setType("PRODUCT.UPDATE");
        event.setData("商品数据...");

        EventHandler eventHandler = eventHandlerFactory.getHandler(event);
        eventHandler.handle(event);
    }
}
使用这种方式我们可以任意扩展EventHandler,因为Spring会替我们管理Bean。而只要support方法写的没有问题,我们总能找到能够正确处理Event的Bean(这里指Spring Bean,下同)。
这种方式的弊端是,每次判断都需要遍历Bean列表。那么我们有没有办法让其能够精准定位呢?答案是肯定的,请往下看。
使用注解优化配置
我们添加一个SupportEvent的注解。
@Target({ElementType.TYPE})
@Retention(RetentionPolicy.RUNTIME)
@Documented
@Component
public @interface SupportEvent {

    @AliasFor(
            annotation = Component.class
    )
    String value() default "";

    String type();
}
加上@Component之后,我们直接在类上加上@SupportEvent,Spring就会自动将对应的类注册为Bean。@AliasFor配置别名,以上配置的意思就是,传入的SupportEvent中的value会设置为Component中的value,Spring在创建Bean的时候这个value值就是Bean的id(或者说name)。
EventHandler中去掉support方法。两个实现类修改为下面的代码
- ProductUpdateEventHandler
- OrderCreateEventHandler
@SupportEvent(type = "PRODUCT.UPDATE")
public class ProductUpdateEventHandler implements EventHandler {

    @Override
    public void handle(Event event) {
        System.out.println("事件数据为:" + event.getData());
    }
}
@SupportEvent(type = "ORDER.CREATE")
public class OrderCreateEventHandler implements EventHandler {

    @Override
    public void handle(Event event) {
        System.out.println("事件数据为:" + event.getData());
    }
}
工厂稍微复杂一点,需要获取到类上的SupportEvent注解,然后获取注解中配置的type。将type作为key,对应的Bean作为value,放到Map中。
@Component
public class EventHandlerFactory implements ApplicationContextAware, InitializingBean {

    private ApplicationContext applicationContext;
    private Map<String, EventHandler> eventHandlerMap = new HashMap<>();

    public EventHandler getHandler(Event event) {
        EventHandler eventHandler = this.eventHandlerMap.get(event.getType());
        if (eventHandler != null) {
            return eventHandler;
        }
        throw new RuntimeException("不支持的事件类型");
    }

    @Override
    public void afterPropertiesSet() throws Exception {
        Map<String, EventHandler> beansMap = this.applicationContext.getBeansOfType(EventHandler.class);
        for (EventHandler eventHandler : beansMap.values()) {
            SupportEvent supportEvent = AnnotationUtils.findAnnotation(eventHandler.getClass(), SupportEvent.class);
            if (supportEvent != null) {
                eventHandlerMap.put(supportEvent.type(), eventHandler);
            }
        }
    }

    @Override
    public void setApplicationContext(ApplicationContext applicationContext) throws BeansException {
        this.applicationContext = applicationContext;
    }
}
这里工厂中获取实现类的依据便是配置在实现类上的@SupportEvent中的type值。注解的获取可以通过AnnotationUtils轻松得到,这是Spring提供的一个工具类。客户端不用变。
这里只是提供一种工厂运用的思路,在实际项目中可以作为参考。但是通常实际项目遇到的问题可能更加的复杂,所以要根据实际情况选择是否使用,不可强加使用。